Capturing the beauty and energy of breaking waves in a painting is one of the most rewarding, yet challenging, aspects of seascape art. Many artists, both beginners and experienced, find themselves struggling to achieve the right balance of translucency, movement, and atmosphere that makes waves feel alive and powerful.
If you've been frustrated by flat or static-looking waves, you're not alone. The good news is that with the right approach and a few helpful tips, you can create waves that leap off the canvas. Here’s how:
1. Understand Wave Structure
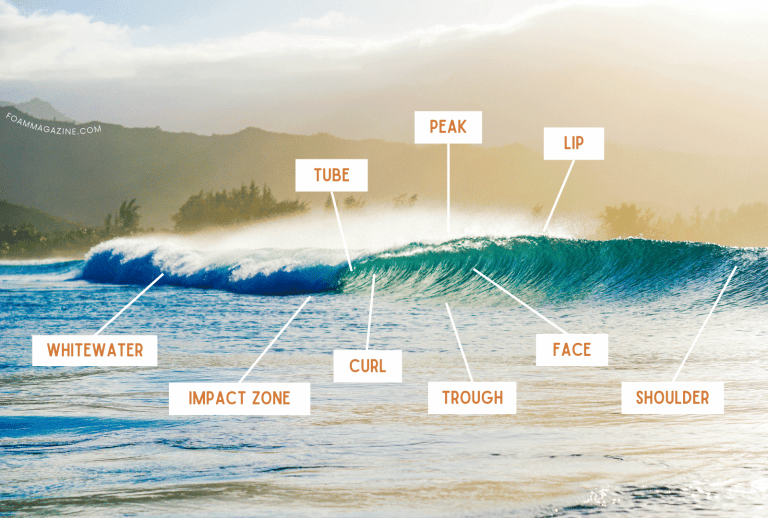
Before diving in, take the time to really understand how waves form and break. Waves have a distinct structure with areas of light, shadow, and transparency. The crest (the white foamy top), the face (the vertical part of the wave), and the base all behave differently with light.

Image credit: Foam Magazine
Tip: Study reference photos or observe waves in person, focusing on how light interacts with different parts of the wave. This will help you accurately depict the various elements.
2. Focus on Translucency
One of the hardest elements to capture is the translucent quality of water, especially at the crest of a breaking wave. Getting this right gives your painting a sense of realism and depth.
Pitfall: Overloading the wave with too much white or opaque paint can make it look solid and heavy, rather than light and transparent.
Solution: Use a glazing technique, layering thin washes of colour, to build the translucent effect. Gradually build up the lightest areas with delicate touches of white, allowing the layers beneath to shine through. Mixing your whites with a touch of cool blue or green can also help mimic the colours of light passing through water.
3. Master the Movement
Waves are in constant motion, and that dynamic energy is key to capturing their essence. However, it’s easy to make waves look frozen or too rigid.
Pitfall: Over-detailing every part of the wave can cause it to look stiff and static, rather than fluid and natural.
Solution: Keep your brushstrokes loose and gestural. Focus on conveying the general flow of the wave rather than getting caught up in every tiny ripple. Using curved, sweeping strokes in the direction of the wave’s movement can help you maintain that sense of energy. Reserve detailed work for the focal points, like the crest, where foam breaks and spray forms.
4. Get the Colours Right
The sea is rarely a flat blue. When painting breaking waves, you need to consider the variety of colours present—greens, blues, purples, and even greys all play a role. The foam and spray aren’t pure white either; they reflect light and the colours of the sky and surroundings.
Pitfall: Using just one shade of blue or relying on pure white for the foam can make your waves look unnatural.
Solution: Mix a variety of greens, blues, and greys to create a more nuanced wave. Try using a limited colour palette and adjusting the tones for highlights, shadows, and reflections. For foam, incorporate soft greys or pale blues to give it more depth and dimension.
5. Build Perspective and Depth
To avoid your waves looking flat and one-dimensional, it’s crucial to build up perspective and depth within your composition. Waves further back should appear smaller and less detailed, while those closer to the viewer should be more distinct and dynamic.
Pitfall: Forgetting to adjust wave size and detail for distance can lead to a painting that feels flat and lacks spatial depth.
Solution: Use atmospheric perspective by lightening and softening the colours of distant waves to push them further into the background. For closer waves, increase the contrast between light and shadow, and use sharper, more defined edges to bring them forward.
6. Capturing the Foam and Spray
Foam and spray are key elements of breaking waves, but they can be difficult to paint without making them look messy or out of place.
Pitfall: Overworking the foam can make it look too heavy, while underworking it can make it appear unrealistic or detached from the wave.
Solution: Use a fan brush or a stippling technique to create the texture of foam. Focus on the areas where the wave breaks, and remember that foam tends to follow the movement of the water, so it should appear fluid and not too uniform. For the spray, a light flick of the brush can suggest the mist created as the wave crashes.
7. Create Atmosphere
A successful wave painting isn’t just about the wave itself; it’s about capturing the mood and atmosphere of the entire scene. Whether you’re painting a calm, sunlit day or a stormy, dramatic seascape, the atmosphere will influence your choice of colours, textures, and lighting.
Pitfall: Focusing solely on the wave and neglecting the background or overall mood can make the painting feel incomplete or disconnected.
Solution: Consider the sky, the time of day, and how these elements impact the colours and lighting in your scene. Use soft gradients in the sky and water to create harmony and guide the viewer’s eye. Dark, stormy clouds will create a different atmosphere than a clear, bright sky, and that should be reflected in your wave’s colour and tone.
8. Practice Patience
Painting waves is a process that takes time, so don’t rush through it. Each layer, whether it's the underpainting or final details, plays an important role in the finished piece. Allow yourself to step back and evaluate your work as you go.
Pitfall: Rushing through the painting without layering properly or giving yourself time to reflect on what’s working can lead to frustration and dissatisfaction with the result.
Solution: Take your time with each step, especially when building up layers of translucency or working on complex wave formations. Step back from your painting occasionally to assess the overall composition and how the waves are interacting with the scene.
A challenging but immensely rewarding experience
Painting breaking waves can be a challenging but immensely rewarding experience. By avoiding common pitfalls and applying these tips, you can bring your seascapes to life with realism, energy, and atmosphere. Remember, waves are always moving, and your paintings should reflect that sense of fluidity and power. Keep practising, stay patient, and enjoy the process of capturing the beauty of the sea on canvas.
If you'd like to get some expert help to get you going, check out my online masterclass How to paint a breaking wave it's extremely good value and you will learn so much about this tricky subject matter.
Happy painting!


Leave a comment